

Rape of the Lock(s)
So many locks, so little time.
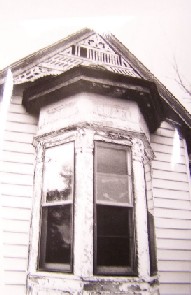
As I mentioned in this post, I'm trying scrounge up enough working, salvaged hardware to put proper doorknobs et cetera on the Devil Queen's doors. Again, here is the space I'm trying to fill.

If I can find locks and knobs that match this profile, I will save my self a ton of work. No modifications or additional work should be needed. I can simply (what a misleading word!) install the new hardware and voila.
Here is our first contender, a hardware set salvage from the Davis House in Atkins.
 This set was immediately disqualified for use in the hallway because it is the wrong size. It isn't wide enough and it is too tall. However, since we used doors salvaged from the Davis House for the master bathroom, laundry room, pantry, and my son's closet, I thought we might be able to use it in one of those locations. I decided to look at its guts which is simple enough. Only one screw holds these locks together, and it is easy remove. Here is what I found after I cleaned out the dead Brown Recluse spiders.

Here is the lock with the dead bolt removed.

And, a closer look reveals that the spring (a band of tempered iron or steel) is broken in half. You might be able to make a replacement spring. I vaguely remember an eighth grade science experiment where we tempered a soft strip of steel (similar in size and shape to this spring) in a Bunsen Burner. You'd super-heat the steel in the burner flame and then plunge it into cold water. The rapid cooling changed the physical properties of the steel and made it stronger. This meant that if bent it would spring back to its original position.
In any case, the set can still be used for a door that you do not want locked, the pantry or closet perhaps?

And here are two photos of the latch. I was going to go into how to reverse the latch to accommodate either left or right opening doors. However, this latch can only face in one direct, so that tangent will have to wait until later. In case you're wondering locks two and three can be reversed, but that will be a different post perhaps.


Our second lock is this one.


I suppose I can still use this lockset for the living room if I cram the bolt back into the jammed position. I mean, I can't think of any particular reason I'd need to lock myself in my living room. Unless the Gestapo is after me. And, if they were, do you think a rim lock is going to stop them? Doubt it.
So, this lock is rated as a maybe. Not my first choice, but I'll use it if I must.
And, here is the third lock.
 Again, this lock is a perfect match to our missing ones.
 To make it even sweeter, this poor lock's ugly face conceals a fully functional mechanism. And, in addition to the key operated deadbolt, it has a second, smaller deadbolt that is manually operated with a switch on the lock's underside. So, if you really want to be left alone, this is the lock for you. No sneaky rat-bastard is going to get in just because he can pick your lock. He'll have kick the damn door down. Needless to say, this lock is going on the master bedroom door. I like my privacy.
They only thing that I don't like about this lock is that it has the same spring-strip mechanisms that the first, broken lock had. I'm afraid that with use, this lock will break too.
At this point in the evening, I was running out of time so our misadventure must come to an end for now. Besides, how many rim locks do you really want to see disassembled?
As I mentioned in this post, I'm trying scrounge up enough working, salvaged hardware to put proper doorknobs et cetera on the Devil Queen's doors. Again, here is the space I'm trying to fill.

If I can find locks and knobs that match this profile, I will save my self a ton of work. No modifications or additional work should be needed. I can simply (what a misleading word!) install the new hardware and voila.
Here is our first contender, a hardware set salvage from the Davis House in Atkins.
 This set was immediately disqualified for use in the hallway because it is the wrong size. It isn't wide enough and it is too tall. However, since we used doors salvaged from the Davis House for the master bathroom, laundry room, pantry, and my son's closet, I thought we might be able to use it in one of those locations. I decided to look at its guts which is simple enough. Only one screw holds these locks together, and it is easy remove. Here is what I found after I cleaned out the dead Brown Recluse spiders.
Here is the lock with the dead bolt removed.

And, a closer look reveals that the spring (a band of tempered iron or steel) is broken in half. You might be able to make a replacement spring. I vaguely remember an eighth grade science experiment where we tempered a soft strip of steel (similar in size and shape to this spring) in a Bunsen Burner. You'd super-heat the steel in the burner flame and then plunge it into cold water. The rapid cooling changed the physical properties of the steel and made it stronger. This meant that if bent it would spring back to its original position.
In any case, the set can still be used for a door that you do not want locked, the pantry or closet perhaps?

And here are two photos of the latch. I was going to go into how to reverse the latch to accommodate either left or right opening doors. However, this latch can only face in one direct, so that tangent will have to wait until later. In case you're wondering locks two and three can be reversed, but that will be a different post perhaps.


Our second lock is this one.

This lock is from my mother-in-law's stash. I was very excited with this one because it is same size as our missing locks. However, I was disappointed to find that the deadbolt mechanism is broken. I'm not sure if it is missing a piece or the deadbolt is bent or misaligned. When I opened the lock, the deadbolt was shoved all the way into the lock. Once I freed the bolt from its jammed position, I encountered a second problem; the "tab" on the underside of the deadbolt, which catches on the key to lock/unlock the bolt, hangs down into the key hole. It is positioned in such a way that you can't fit a key into the hole. No amount of fumbling with the bolt solved the problem. Either it was jammed into place or it blocked the hole.

I suppose I can still use this lockset for the living room if I cram the bolt back into the jammed position. I mean, I can't think of any particular reason I'd need to lock myself in my living room. Unless the Gestapo is after me. And, if they were, do you think a rim lock is going to stop them? Doubt it.
So, this lock is rated as a maybe. Not my first choice, but I'll use it if I must.
And, here is the third lock.
 Again, this lock is a perfect match to our missing ones.
 To make it even sweeter, this poor lock's ugly face conceals a fully functional mechanism. And, in addition to the key operated deadbolt, it has a second, smaller deadbolt that is manually operated with a switch on the lock's underside. So, if you really want to be left alone, this is the lock for you. No sneaky rat-bastard is going to get in just because he can pick your lock. He'll have kick the damn door down. Needless to say, this lock is going on the master bedroom door. I like my privacy.
 They only thing that I don't like about this lock is that it has the same spring-strip mechanisms that the first, broken lock had. I'm afraid that with use, this lock will break too.
At this point in the evening, I was running out of time so our misadventure must come to an end for now. Besides, how many rim locks do you really want to see disassembled?
Labels: rim locks
posted by John | 6:12 AM
![]()
![]()
13 Comments:
I'm planning on going to our local old house salvage place this weekend, so if you want, I can look over their rim locks for you. I'm going to be looking at one for us anyway, so it won't be out of my way at all. Since it's not for profit, everything is very reasonable. You can contact me at ChelseaSP@aol.com :)
Fascinating! Thank you for posting so many pictures. The locks are beautiful.
The deadbolt on the second lock is upside down. That's why the tab is in the way of the keyhole, turn it so it's facing up. I have a ton of rim locks that I've been restoring for our house, some are in pretty horrible shape so I've had to do a lot of work on them. You may also want to check the hardware stores and even auto parts stores for replacement springs.
Ok check that, looking at it again maybe it's not upside down. I cant tell for sure though from the picture. That's a weird lock, I haven't seen one like it before. Usually the notched part of the deadbolt is facing down to fit the key.
Send me the dimensions of the locks you need and the position of the holes in relation to the door edge. I have a few locks left over that may work for you. As for keys, most locks can be opened with one of three basic key designs. Keys need to have a long shaft to fit through the door. Do you need any black knobs? I bought a crapload on ebay and won't be needing all of them and may be able to let a few go. I won't charge any more than I paid per piece(which wasn't a whole lot).
I have rebuilt several of these locks. Oil and a good cleaning is usually all they need inside. I would look for really, really bad locks on EBay you can get cheap to use for spare parts for things like that spring steel. Of the dozen or so I’ve fixed up I’ve never seen a broken piece of spring steel, so I wouldn’t be too concerned with breaking another one.
One of my best EBay scores was 6 rim locks with porcelains knobs for $60. I bought them for the knobs. I cleaned up the rim locks – cleaned and oiled the guts and stripped and repainted the cases - and I was able to sell 5 complete locks with knob and key eucstions(?) of EBay for $170.
Piece of watch mainspring is just the trick for that latch spring. Find some jeweller that's been around awhile if they can roust up some old 18 size mainsprings-something beefy, like the '83 model Walthams or the 5th model Elgin.
Break it to length-it's already tempered, and it'll go right in. If you can't lay hands on any tell me the width of that chunck you have and I'll scare one up.
This is completely off of this topic, but...
DUDE! I just saw the article in the Columbus (Ohio) Dispatch that mentions you and your blog! Cool!!
Gotta say I've REALLY enjoyed reading this blog over the past several months (I'm not a remodeler myself...this is just really interesting to me, especially since you guys live nearby.)
Anyway, congrats from your fan in the paint dept.! LOL
Chelsea, thanks for the offer. I'll probably hold off on buying locks until I finish going through our invetory. However, if they have any 3 1/4 inch catches for these locks, I'd be willing to pay for those. I need four. Thanks!
Reluctant, your welcome.
Jason, Thanks!
Gary, thanks for the offer. I try to sort through the rest of them this weekend, and, if I need more, I'll let you know. I think I have enough knobs, but I'll check while I'm at it.
Greg, thanks for the tip. I'm hoping that I can salvage all the spare parts I need from my damaged locks. If not, it's hard to beat ebay. What did you use to paint your locks? I was thinking black spray paint for metal (can't think of the brand name now, same as we used for the claw foot tub) for ours.
Tim, cool. Thanks for the tip. We have a couple decent jewelers in town, but I let you know if I can't find any.
OM, thanks!
I did use a gloss, black spray paint. Probably Rustoleum. After I did it, they looked fine, but I thought maybe black lacquer would have been better.
I was lucky enough that almost every single peice of hardware in my house (kitchen excluded) was orginal, its all been painted over but I am hoping some stripper and black metal spray paint will do the trick. And may I say I found more useful info on how to complete my own projects here than any where else on the internet!
I painted mine with aniline tinted shellac and posted pictures here
http://thisoldcrackhouse.blogspot.com/2005/07/another-use-for-shellac.html
Do you need me to send you some aniline dye?
Greg, Rustoleum! That was the brand I was trying to remember. Thank you. I've had nearly identical thoughts on the finish. I think I've narrowed it down to shellac or black Rustoleum. I'm not ready to tackle that particular project yet since refinishing the doors first would probably be helpfull.
Amy, thank you. I'm flattered.
Gary, Thanks for the offer. Per my response to Greg, I'm still on the fence regarding the finish. I may take you up on it though. If so, I'll let you know. Thanks for the link too.
Post a Comment
<< Home