


The Much Maligned Drum Sander
First, thanks for all the complements on the floor. Even with the whirls, I’m pretty pleased with how the floor turned out. It’s given me a lot of confidence in taking on the rest of the floors. It’s amazing how obsessively working on 80 square feet of flooring can make you feel like you know what you’re doing.
 Like Greg and others, everything I heard or read about in preparation for this project warned me about the evils of the dreaded drum sander. However, after working with this gentle giant, I have come to the conclusion that its smaller, seemingly innocuous cousin, the edger, is one that should watched.
 For those of you who are not familiar with edgers, they are basically giant orbit sanders on steroids. And, they are not random orbit sanders either. They are one giant spinning disk of sanding death. I’m not sure if it’s because I’m pudgy and weak or the motor on the edger was just that powerful, but the damn thing was almost more than I could control. Some of the floorboards were uneven (one board was higher than the one next to it) and when the edger hit the high board it would jerk or jump. It took a lot of effort to keep it from running off.
Supposedly, as you work through the finer grades of paper, the whirls will get sanded out leaving you with a mirror like surface. While I admit there may be some faults in my technique, this has not been my experience (I’m in agreement with Angus on this one). I still may use an edger for my other floors, but I’m going change the procedure that I follow.
The procedure I followed with the master bathroom is:
1) Sweep floor and pull grate off heating & air duct.
2) Use drum sander for most of the floor.
3) Sand along the wall with the edger.
4) Used the drum sander to “blend” the areas sanded with edger with the rest of the room.
5) Use palm sander (has an iron shaped pad with point, great for corners) to sand corners, around pipes, and other rough-ins.
6) Hand sand and palm sand whirls on imperfections left by edger.
7) Vacuum, tack-cloth, stain, et cetera.
The revised procedure I plan to use on my next floor:
1) Sweep floor and pull grate off heating & air duct(s).
2) Uses the edger around along the wall.
3) Drum sand the rest of the room making an effort to go over the areas sanded by the edger as much as possible.
4) Use the palm sander (or hand sand if necessary) to finish the areas sanded by the edger.
5) Vacuum, tack-cloth, stain, et cetera.
First, the new procedure shaves two steps off the list. Second, I’m hoping that this will remove any and all whirls from the wood. In about three weeks, we’re planning on renting the sander again, so we’ll see how this new procedure works out.
In short, the key to using a drum sander is to keep it moving. Start pushing it before you engage the drum and keep moving it until the drum is fully disengaged. From what I can tell, you’d have to be careless, unlucky, or both to seriously damage your floor with the drum sander. Knock on wood for me; I hope don’t have to eat my words on this one. A lot can happen in the other 1770 square feet.
Here are a few more tips for all of you would-be floor-refinishers:
1) Take your time. Sanding the bathroom floor probably took me three times longer than it should have, but it was my first experience with it. Even though it didn’t turn out perfect, there is nothing so wrong with it that it is permanently blighted.
2) When you change the paper on the drum, make sure you tighten the screws & bar down as tight as you can without stripping the heads. If you don’t get it tight, the bar or screws could gouge the floor. This didn’t happen to me, but I checked on it obsessively every time I changed the paper (unplug the sander while changing the paper). Also, if you are renting the sander, check the screw heads on the drum when you pick it up. These get used a lot and they might be stripped. The rental place should (mine did) check this for you, but do it just to be sure. There is no need to make a second trip if you can get new screws the first time you are there.
3) Check your paper every now and then. It goes a lot faster when your paper isn’t worn out.
4) Never engage the drum (lower it to the floor) when the sander is stationary. Get it rolling a little and then engage the drum.
5) When the drum is engaged, the sander will want to run forward. Don’t let it. Lean back and let it move forward slowly. Take little granny steps. The paper bites better, and it will go quicker.
6) Don’t be afraid of the coarse grit papers. There is a time & a place to use them.
7) If your floor boards are uneven, cut across the grain of the flooring at a 45 degree angle for your first pass with a coarse grit paper. Here is a picture of our bedroom floor after a few passes with 60 grit paper on the drum sander. Our floor boards are cupped (the edges are higher than the middle of the boards).
 Going with the grain only takes the top off the edges while leaving the middle untouched. If you sand long enough, you will eventually even everything out. However, if you cut across the grain, it will sand down faster. I used this technique in the master bathroom. After two passes at 45 degrees, I went back to sanding with the grain and it went much faster.
8) With the exception of tip seven, always go with the grain whether you’re sanding, sweeping, staining, et cetera.
I’m sure that I’ll have more to say on this topic as we work our way through the Queen, and I hope these tips help you all some. So far I’d say the idea of refinishing our floors was more intimidating than the actual job itself. If you’re thinking about doing your floors, go for it.
 Like Greg and others, everything I heard or read about in preparation for this project warned me about the evils of the dreaded drum sander. However, after working with this gentle giant, I have come to the conclusion that its smaller, seemingly innocuous cousin, the edger, is one that should watched.
 For those of you who are not familiar with edgers, they are basically giant orbit sanders on steroids. And, they are not random orbit sanders either. They are one giant spinning disk of sanding death. I’m not sure if it’s because I’m pudgy and weak or the motor on the edger was just that powerful, but the damn thing was almost more than I could control. Some of the floorboards were uneven (one board was higher than the one next to it) and when the edger hit the high board it would jerk or jump. It took a lot of effort to keep it from running off.
Supposedly, as you work through the finer grades of paper, the whirls will get sanded out leaving you with a mirror like surface. While I admit there may be some faults in my technique, this has not been my experience (I’m in agreement with Angus on this one). I still may use an edger for my other floors, but I’m going change the procedure that I follow.
The procedure I followed with the master bathroom is:
1) Sweep floor and pull grate off heating & air duct.
2) Use drum sander for most of the floor.
3) Sand along the wall with the edger.
4) Used the drum sander to “blend” the areas sanded with edger with the rest of the room.
5) Use palm sander (has an iron shaped pad with point, great for corners) to sand corners, around pipes, and other rough-ins.
6) Hand sand and palm sand whirls on imperfections left by edger.
7) Vacuum, tack-cloth, stain, et cetera.
The revised procedure I plan to use on my next floor:
1) Sweep floor and pull grate off heating & air duct(s).
2) Uses the edger around along the wall.
3) Drum sand the rest of the room making an effort to go over the areas sanded by the edger as much as possible.
4) Use the palm sander (or hand sand if necessary) to finish the areas sanded by the edger.
5) Vacuum, tack-cloth, stain, et cetera.
First, the new procedure shaves two steps off the list. Second, I’m hoping that this will remove any and all whirls from the wood. In about three weeks, we’re planning on renting the sander again, so we’ll see how this new procedure works out.
In short, the key to using a drum sander is to keep it moving. Start pushing it before you engage the drum and keep moving it until the drum is fully disengaged. From what I can tell, you’d have to be careless, unlucky, or both to seriously damage your floor with the drum sander. Knock on wood for me; I hope don’t have to eat my words on this one. A lot can happen in the other 1770 square feet.
Here are a few more tips for all of you would-be floor-refinishers:
1) Take your time. Sanding the bathroom floor probably took me three times longer than it should have, but it was my first experience with it. Even though it didn’t turn out perfect, there is nothing so wrong with it that it is permanently blighted.
2) When you change the paper on the drum, make sure you tighten the screws & bar down as tight as you can without stripping the heads. If you don’t get it tight, the bar or screws could gouge the floor. This didn’t happen to me, but I checked on it obsessively every time I changed the paper (unplug the sander while changing the paper). Also, if you are renting the sander, check the screw heads on the drum when you pick it up. These get used a lot and they might be stripped. The rental place should (mine did) check this for you, but do it just to be sure. There is no need to make a second trip if you can get new screws the first time you are there.
3) Check your paper every now and then. It goes a lot faster when your paper isn’t worn out.
4) Never engage the drum (lower it to the floor) when the sander is stationary. Get it rolling a little and then engage the drum.
5) When the drum is engaged, the sander will want to run forward. Don’t let it. Lean back and let it move forward slowly. Take little granny steps. The paper bites better, and it will go quicker.
6) Don’t be afraid of the coarse grit papers. There is a time & a place to use them.
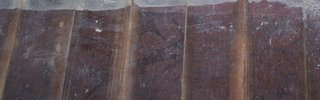
7) If your floor boards are uneven, cut across the grain of the flooring at a 45 degree angle for your first pass with a coarse grit paper. Here is a picture of our bedroom floor after a few passes with 60 grit paper on the drum sander. Our floor boards are cupped (the edges are higher than the middle of the boards).
 Going with the grain only takes the top off the edges while leaving the middle untouched. If you sand long enough, you will eventually even everything out. However, if you cut across the grain, it will sand down faster. I used this technique in the master bathroom. After two passes at 45 degrees, I went back to sanding with the grain and it went much faster.
8) With the exception of tip seven, always go with the grain whether you’re sanding, sweeping, staining, et cetera.
I’m sure that I’ll have more to say on this topic as we work our way through the Queen, and I hope these tips help you all some. So far I’d say the idea of refinishing our floors was more intimidating than the actual job itself. If you’re thinking about doing your floors, go for it.
posted by John | 4:07 AM
![]()
![]()
5 Comments:
Way to go & thanks for all the info. I think we'll still have someone do our floors, but you never know...
Great tips. Thank goodness our floors were refinished long ago. The idea of going after them with a giant sander terrifies me!
Hey John, nice write up. I'll put a blurb up on Toolspotting tomorrow pointing to it.
Ditch the edger and buy a variable speed polisher/grinder. Cut the used drum sander paper into discs and use it to sand the edges.
When you are done with the floors you can use the grinder to buff the car, wax the floors, polish concrete counters or even marble. At least that is what I do here at the crackhouse! I only have 3 floors left to sand. Six are done already. When you are done with the poly, rub the floor with superfine steel wool and wax polish. Then buff it. It will make dusting easier and the surface will feel much smoother but it will make it very slippery for a week!
Great points John! I think the revised method of attack really makes sense too!
Again, your floors look great! Are the walls next? ;) Do they make an antigrav sander? Or are you gonna have to rig something up? :P
Post a Comment
<< Home