

Shear Walls, Framing, and Air Flow or Anatomy of a Wall Two
Ron from Top to Bottom left an interesting comment that I’ve quoted here:
“I think your ideas about the lower class cheap housing in the south is right on. From what I know, this type of construction is used because, if your illustration is correct, they eliminated one entire layer by putting the sheathing on the inside. This gave them a semi-finished interior surface and save a pile of labor and material. Sin[c]e for the most part in many places in the south they are not too worried about keeping air movement out of the system this was not a problem. In the north this would be a big problem. Renovating these houses can be a problem though. If some people do what you mentioned in one of your options of removing the interior boards, it could be disastrous. Those boards are probably acting as the shear walls [click here or here for definitions at Wikipedia], or a major portion of that, and if it is replaced by sheetrock, that has no shear strength; you can have a major major problem. Insulating that system can also bring problems that might not be immediately apparent. Changing the airflow system of that type of house can cause some big mold and rot problem down the road. I think your approach is probably the smartest option”
Not only where the builders of old home in the South, “not too worried about keeping air movement out,” but they actually designed their homes to have maxiumum air flow. I’ve mentioned this in a couple of previous posts [this is the only one I could find], but I’d like to elaborate on it in regard to the walls.
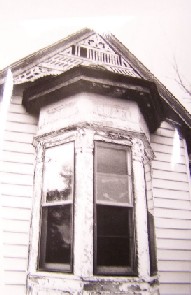
Here is a rough sketch of the framing for the Devil Queen:
It is pretty straight forward. They lay the sill first (on top of rock piers in this case). Then the floor joists are installed. The joists are notched and set on top of the sill. I don’t care too much for this particular technique. Here is why:
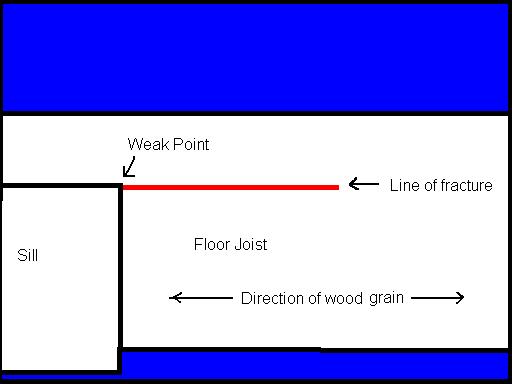 Over time the joist tends to split/crack in the direction of the wood grail staring from the corner of the notch/cut-out. So far this hasn’t been an endemic problem, but there were a few joists that I had to jack-up until the crack closed, sister new 2x10’s or 2x12’s to the joist, and add another pier under the joist in some cases.
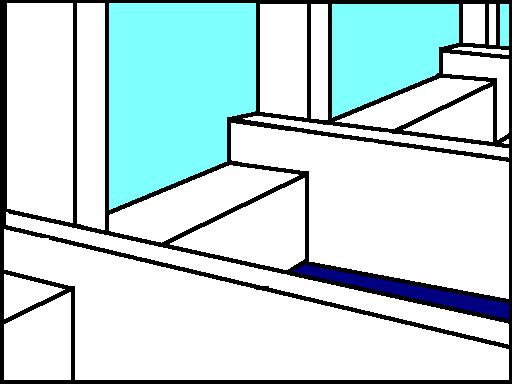
This building technique does have an advantage from an air flow point of view. Here is a diagram of the framing with the tongue-in-groove flooring added:
 And here is a cross section of the framing if you cut the room in half between & parallel to two floor joists:
 The notched technique allows cooler air from the crawl space to flow up into the pockets inside the walls. The pockets also allow warm air (air in the pockets is heated from the sun shining on the siding, etc) to escape upward creating a convection current. In some homes (but not the Devil Queen), there is a small opening into the attic at the top of the wall pocket. This allows the air to vent into the attic an out of the house via gaps under the original wood shake shingles (which the Queen did have).
Some of you may be thinking, “what about the firebreaks between the studs?!” Based on the walls we have opened up in the Queen I’ve concluded that none of the original walls have firebreaks. From what I understand, the use of firebreaks didn’t become common or required until after World War II.
To retrofit the Queen for insulation, we had Kenny block off the bottom of the wall pockets in the crawlspace with 2x4’s. If we hadn’t done this, when (if?) a contractor blows insulation into the wall pockets it will spill out the bottom until the crawlspace is filled. We’re hoping that this blocking, the fire-retardant insulation, and 100% new wiring will alleviate any fire concerns. Still, there is no way in hell that I’d strip paint off the Queen with a heat gun!
As for the tongue-in-groove wallboards serving as shear walls, Ron is absolutely correct. Without the wallboard it would only be a matter of time before the Devil Queen collapsed. Replacing the wood shake shingles (requiring no decking) with composition shingles (requiring decking) also increases the weight the walls have to support.
If you wanted to get rid of the interior wallboards, I’d recommend the following:
1) Strip off all the exterior siding.
2) Install firebreaks and reinforce framing as necessary.
3) Sheath the exterior framing with plywood or something comparable.
4) Install new siding.
5) Strip off all the interior wall boards.
6) Run wiring, plumbing, etc as needed.
7) Insulate.
8) Sheetrock.
To make everything fit together correctly, you’d probably also have to either replace the old windows or build out the frames, sashes, etc to get everything built out to accommodate the thicker walls. I’ve also see houses where folks have wrapped the sheathing in some sort of vapor barrier (?); having never done that myself I don’t know any of the pros, cons, code, etc regarding that.
Also, don’t count on getting to reuse all the old siding and wallboard you pull down. A lot of them won’t survive the removal process no matter how careful you are. In my experience, the interior wall boards will fair better.
posted by John | 4:55 PM
![]()
![]()
5 Comments:
Wow, that is one hell of a post. If all of that knowledge is what you have learned on your own, then a big congratulations to you. Nice use of sketch up? for visuals. That wrap that you mentioned is a "wind wash barrier". Often what you see is the Tyvek brand House Wrap. This is the modern version of tarpaper. (I could go on a very long tirade but....) You are right your local codes will determine what is required for a tyvek or tarpaper barrier. Once again nice post. It's always fun to see how much some of the housebloggers really know!
I guess "Miser" doesn't come from "optmise" but actually refers to "misery"... ;-)
John, you are one staggeringly knowledgeable exorcist. Fascinating post, esp to those of us in wood houses up North...
I confess to not knowing anything about building houses, or renovating them, but i thought that you and your wife might like to watch The history channel's program on renovating a dilapidated old victorian. Here is the link; it starts in September. Maybe it will be too much, considering you have "reality tv" with the devil queen already, but i thought that you might be able to pick up some tips.
http://www.historychannel.com/classroom/victorianreborn/index.html
Thanks for the comments everyone. Sorry for the long silence, it shall end shortly.
Post a Comment
<< Home