

Learning to Love My Heat Gun
So, I started in on the floors again. After eleven months of inactivity, it started again. Who can say why exactly? Fear? Loathing? Voodoo? Boredom? Hell, does it matter?
First, as the tumbleweed photo below indicated, I had to do a thorough cleaning to find the bloody floor. And move furniture. And this was just to finish the dining room floor, which is supposed to be finished for Thanksgiving. 2007. Just saying.
Really, I'm embarrassed at how quickly this went. I mean, I could have had this finished last year.
Here is the before picture of the unfinished portion of the dining room floor.

I finally put the old pine plugs Gary sent to good use. Thank you Gary!
 Here is a gripping photo of a round plug in a round hole!

And a puttied round plug in a round hole!
 And here is the money shot: the dining room floor with all of its sanding prep completed.
 Of course, I missed a few spots. Details.

First, as the tumbleweed photo below indicated, I had to do a thorough cleaning to find the bloody floor. And move furniture. And this was just to finish the dining room floor, which is supposed to be finished for Thanksgiving. 2007. Just saying.
Really, I'm embarrassed at how quickly this went. I mean, I could have had this finished last year.
Here is the before picture of the unfinished portion of the dining room floor.

I finally put the old pine plugs Gary sent to good use. Thank you Gary!
 Here is a gripping photo of a round plug in a round hole!
And a puttied round plug in a round hole!
 And here is the money shot: the dining room floor with all of its sanding prep completed.
 Of course, I missed a few spots. Details.
Since things were moving along, I decided to start on the living room floor. The wood putty I use is filled with all the marvels of modern science: carcinogens, toxic solvent, and other sixteen syllable compounds. I quickly deduced that mystery finish on the living room floor was shellac. The acetone and ethanol alcohol in the wood putty quickly reactivated it. Shellac is a lot better than lead based paint. Since I knew that it was shellac that I was dealing with, I could benefit from everyone else's houseblogging experiences. For once, I knew what to do. I dragged out my heat gun, near virginal in condition, and went to work on the shellac. Sure, I could have used the drum sander on it, but I'd be changing the paper every minute or two as the shellac gummed it up. At a dollar a roll for the sand paper, this will add up quick. I guestimate that stripping the shellac may not save me time in the long-run, but it's probably saving me $20-$30.

The shellac came right up. There appears to be three coats of it. The first is a light cherry color, the next layer is darker with an amber hue, and the final coat is a fugly poo-brown that is so dark that I originally thought it may have been paint. One wonderful thing is that they didn't shellac under the rugs, they just did the rooms perimeter. I guess they had different sized rugs over the years. The rugs seem to have gotten larger over time. This is how I can see all the different layers. Here is a picture.

Here is the next problem area. This corner is going to suck. Even after I strip the shellac, most of this section will have to be hand sanded since this corner is too small for a drum sander. Feel the pain.
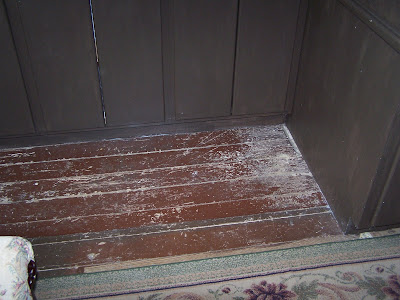

Anyhow, more to come.
Labels: clean-up, dining room, floors, heat gun, living room, scraped flooring, shellac
posted by John | 11:57 PM
![]()
![]()
11 Comments:
Seems like a lot of work. I'm putting floors down and it's a slow going at this point. All the bending over is starting to add up (so I sort of feel your pain)
Ethan, I feel your pain. I did the floors in two additions and the kitchen. That is slow going with a lot of stooping and crawling around, definately painful. Prepping the floors is almost easier, you can sit if you want. Good luck.
It's cool to see the different layers as you dig down. Kind of reminds me of our downstairs bathroom which from sheet rock had: 70's wallpaper, paint, 80's wallpaper, paint, and finally some really "nice" paper seashells they'd glued around the belly button level all around the bathroom. Above that abomination was tan ("SAND"?) and below was a light teal ("WATER"?) Oh boy, what a fun trip to the beach...while I'm taking a leak.
My mom scraped everything off to sheetrock (about a 4 hour job) and then she and my wife put fabric up using liquid starch. It looks awesome now. We used some Home Despot MDB particle board wainscoating kit up to about 3.5 feet and it turned out pretty nice.
I finally just finished the last job. The f-cktards had left about a 7/16ths gap behind the sink to the wall. Dust, soap, and water would get collected back there and it looked like a West Virginia truck stop bathroom at 9:30pm on a Friday. Bad...in otherwords. I bit the bullet and bought 4 small rectangular marble tiles (for about $4) and glued & caulked them into the gap. It doesn't look great...but better than the flipping truck stop.
Keep up the good work. And bring on the artwork!
Archimedes, formerly of "The Last 100 days"
Archimedes,
Good to hear from you again. I hope your move back to the states went well enough.
The bathroom you described sounds like the bathroom in our first house. It was less truckstop but more red-neck hovel. What can I say? We only buy the best.
oh yay, progress! Old wood floors are *the best*. You are lucky to have them. We have, sniff, none in Marrakech. Wood here is a precious commodity, you know right behind gold and silver. This is the Sahara desert, after all.
I could be wrong here, but I think it's maybe the wax that was used on top of the shellac that gums up the paper so badly. We thought we had shellac and varnish, but we discovered that we actually had shellac and wax-- many many sheets of sandpaper later. It was only the top gunky layer that was bad; underneath went pretty quickly. Good call on the heat gun. We decided to re-shellac-- with amber, then de-waxed, then poly. I love it.
And thanks for the Boston tips!
Maryam,
Wood floors are great, but there is something to be said for tile, domes, and olive groves, no?
Amalie,
I don't know if there is any wax on these, but once you put the heat gun on them, it's a moot point. Shellac is great stuff, but I think we're going to stain and seal with poly like we did in the rest of the house just for consitancy sake if nothing else at this point.
Enjoy Boston!
Just a question -- why the heat gun instead of a floor sander. I know you save on the dust, but it seems like lots more work, not to mention the potential to start a fire!
My advice, not that anyone listens to me is, put down three coats of shellac over the stain in lieu of the first coat of poly. Lightly sand with 220 grit after 2nd coat and again after 3rd coat. Then apply poly. Trust me, you will be glad you did. Makes a big diffence in how the floor turns out. Shellac does something that makes the grain pop. Also recommend you wax with superfine steel wool after poly. Makes cleaning much easier.
Allison,
It's not just the dust, it's not having to change the paper on the sander ever two minutes for an hour. At a dollar or two a sheet that adds up. Plus, the sanders we use require you to remove a metal bar held in place with three screws to change the paper, every time. No fun.
And, so far, no fires.
Gary,
I might just have to take your advice just to fuck with you a little. Seriously.
Post a Comment
<< Home