One Gallon of Grease
Kenny & Burt returned to the Devil Queen. Yesterday they started work on the vent-hood. This is a bit more complicated than it ought to have been. Somehow things always seem to work this way.
The core problem is that we changed the layout of the kitchen several times over the last couple of years. To keep this short, the main problem is that the window over the sink is closer to the stove than we planned for it to be.
Now, as I understand it, most builders (and some building codes require) the vent-hood to hang 2-3 inches past each side of the stove top. With the configuration of our kitchen, this isn’t possible. The left side of the vent-hood will be roughly even with the stove top. The right side will not be. For it to be even with the right side of the stove, we’d have to build the hood over the window trim. Aside from the fact that it would look bizarre, it would also mean that we’d never be able to replace the window-weight cords if (when) they break (no access panels).
So, we have a compromise solution which ought to work fairly well. We hope. Here are some sketches I made for Kenny (Sorry the one is sideways; I thought I fixed it but didn't. Oops).

 The hood will be off center, but that isn’t the end of the world. Asymmetry can look balanced if handled correctly. On the other hand, since the kitchen is nearly finished, I’m not sure what we could do or move to balance it out if it looks odd. Blind faith is all we’ve got now.
If you measure from the cabinet to the left of the stove over to the window trim, you get exactly 26 inches. This is the maximum width our vent-hood can be. I’m sure you’ll be shocked to discover that 26 inches is not a standard hood size; 32-36+ inches seems to be the standard width range. What other options are there? There is only one that I found, special order.
The Lowe’s special order catalogue had two vents (sans a hood) that would fit our area. One was 22 inches wide and the other was 16 inches. We picked the 16 inch vent (photo at bottom).
It cost us about $68 (including tax I think). It has a light, a single vent (the 22 inch one had dual vents), and a 7 inch diameter exhaust vent. Now, all we need is Kenny to build a custom hood out of wood, install the vent, and run the duct work out the roof. Then we get to milk paint the exterior and latex paint the interior.
Of course, there is the obvious question: if this is such an ordeal, why bother with the vent-hood at all? In researching vent-hoods, I came across this bit of information. The average kitchen stove can generate around 1 gallon of airborne grease per year through cooking. If the grease isn’t vented, it accumulates in the home and becomes rancid. This attracts insects and encourages mold growth. I believe the inclusion of a vent-hood that vents outside is becoming a common building code requirement. That has got to be a good thing unless you’re into grease saunas.
So, I figure our odd little custom vent-hood is well worth the effort; a little hood is better than nothing.
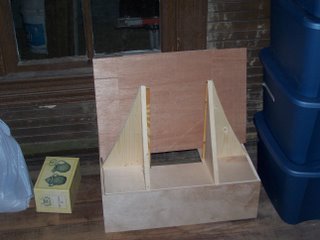
Here is the beginning of the hood. The rectangle of plywood sitting on top of it is what the curves will be clad in.
The core problem is that we changed the layout of the kitchen several times over the last couple of years. To keep this short, the main problem is that the window over the sink is closer to the stove than we planned for it to be.
Now, as I understand it, most builders (and some building codes require) the vent-hood to hang 2-3 inches past each side of the stove top. With the configuration of our kitchen, this isn’t possible. The left side of the vent-hood will be roughly even with the stove top. The right side will not be. For it to be even with the right side of the stove, we’d have to build the hood over the window trim. Aside from the fact that it would look bizarre, it would also mean that we’d never be able to replace the window-weight cords if (when) they break (no access panels).
So, we have a compromise solution which ought to work fairly well. We hope. Here are some sketches I made for Kenny (Sorry the one is sideways; I thought I fixed it but didn't. Oops).

 The hood will be off center, but that isn’t the end of the world. Asymmetry can look balanced if handled correctly. On the other hand, since the kitchen is nearly finished, I’m not sure what we could do or move to balance it out if it looks odd. Blind faith is all we’ve got now.
If you measure from the cabinet to the left of the stove over to the window trim, you get exactly 26 inches. This is the maximum width our vent-hood can be. I’m sure you’ll be shocked to discover that 26 inches is not a standard hood size; 32-36+ inches seems to be the standard width range. What other options are there? There is only one that I found, special order.
The Lowe’s special order catalogue had two vents (sans a hood) that would fit our area. One was 22 inches wide and the other was 16 inches. We picked the 16 inch vent (photo at bottom).
It cost us about $68 (including tax I think). It has a light, a single vent (the 22 inch one had dual vents), and a 7 inch diameter exhaust vent. Now, all we need is Kenny to build a custom hood out of wood, install the vent, and run the duct work out the roof. Then we get to milk paint the exterior and latex paint the interior.
Of course, there is the obvious question: if this is such an ordeal, why bother with the vent-hood at all? In researching vent-hoods, I came across this bit of information. The average kitchen stove can generate around 1 gallon of airborne grease per year through cooking. If the grease isn’t vented, it accumulates in the home and becomes rancid. This attracts insects and encourages mold growth. I believe the inclusion of a vent-hood that vents outside is becoming a common building code requirement. That has got to be a good thing unless you’re into grease saunas.
So, I figure our odd little custom vent-hood is well worth the effort; a little hood is better than nothing.
Here is the beginning of the hood. The rectangle of plywood sitting on top of it is what the curves will be clad in.


0 Comments:
Post a Comment
<< Home